Replace its old neon tubes with LED neon lights. Why and how to install them?
Founded in the early XNUMXth century, the traditional fluorescent neon tube revolutionized the lighting of factories and offices. Coming in the form of a glass tube, it is quickly found everywhere, whether on advertising panels and commercial signs, or in private homes. Today, this type of lighting is gradually disappearing from the market and giving way to LED neon lights, which are much more advantageous in terms of both efficiency and energy consumption. At the end of this article, you will find a detailed photo report on the replacement of classic neon tubes by LED neon tubes. Indeed; it's a bit more complicated than changing a light bulb.
The advantages of LED neon over fluorescent and halogen tubes
Longer lifespan
The LED neon tube is above all a lamp with a fairly long lifespan. Indeed, thanks to LED technology, it can go up to 40 hours, against 000 to 8 hours for the halogen tube depending on the frequency of use, and only 000 hours for fluorescent models. . As an indication, for the compact fluorescent tube, the operating principle of which is similar to the fluorescent tube, the life of the bulb is evaluated between 10 and 000 hours.
Low energy consumption
The LED neon tubes, like those offered on the site Silamp.co.uk, also have a high energy potential. Their design, components and characteristics mean that they consume very little energy compared to traditional tubes. By choosing this type of lighting, you reduce your energy consumption by almost 80%. In this case, it is the most economical and ecological lighting solution on the market.
Instant ignition
Unlike fluorescent tube and halogen lamp, LED neon does not need a waiting time before providing 100% of its lighting. It turns on instantly, does not produce unwanted flickers and immediately reaches its maximum light intensity level. In addition, with LED technology, LED neon perfectly supports repetitive extensions.
A light that does not burn
Like any device operating on the principle of an electric current conductor, LED neon lights still produce a little heat. Unlike halogen lamps, the temperature emitted is however 90% lower than that of an incandescent lamp, and 80% lower than a halogen version. The risk of burns is therefore minimal. You can handle an LED tube that has been on for days without getting burned.
LED neons do not contain toxic products
Unlike fluorescent tubes, LED neon lights do not contain toxic products. In fact, fluorescent lamps consist of a mixture of harmful gases, that is to say, argon and mercury at low pressure, which, under the impulse of an electric shock, will be caused to ionize in order to emit light. If ever a fluorescent tube breaks, it is strongly recommended to ventilate the room and leave it for at least 30 minutes, in order to allow the mercury to evaporate. Neon LEDs do not emit ultraviolet rays or electromagnetic waves that could affect electrosensitive people.
The diversity of models and temperatures of LED neon tubes
The dimensions and lighting colors of LED tubes
Today, LED neon tubes are available in a wide variety of sizes to best meet your needs. Popular for home use, the 60cm model provides additional lighting in places often left in the shade and not supported by main lighting, whether indoors or outdoors, ranging from the garage and from the terrace to the entrance hall. The installation is done both individually and in series, and in a linear or elliptical way. The 90cm LED neon, available in warm white, neutral white or cold white, also finds its place in most rooms of the house, whether in the living room, in the kitchen or in the bathroom.
The 120cm long neon provides lighting colors of 3, 000, or even 4K, as needed. Thanks to its 200 ° lighting angle, this model is suitable for lighting commercial spaces, supermarkets and warehouses. With a power of 6 or 400 Watts for 120 or 24 lumens, the 50-centimeter LED neon with a lighting angle of 2 ° diffuses light in an exceptional way. You can use it to illuminate certain public spaces like a parking lot, shed or warehouse.
The format: T5 or T8
LED neon comes today in a T8 format. By providing directional light, this model ensures the lighting of spacious places. Rather imposing, it is ideal for professional use, whether in offices or in a car park. Featuring a G13 base with two pins spaced 13mm apart, it is available in a 26mm diameter. Its power varies from 9 to 80 Watts, for a light intensity of between 900 and 5 lumens.
The T5 LED tube, for its part, has a G5 base, i.e. 5 mm between pins and has a diameter of 16 mm. It is much smaller and much rarer, used in some fixtures or accent lamps. Lightweight, and with a power of 9 or 24 Watts, for a brightness between 900 and 2 lumens, this model is less powerful than the T400 tube.
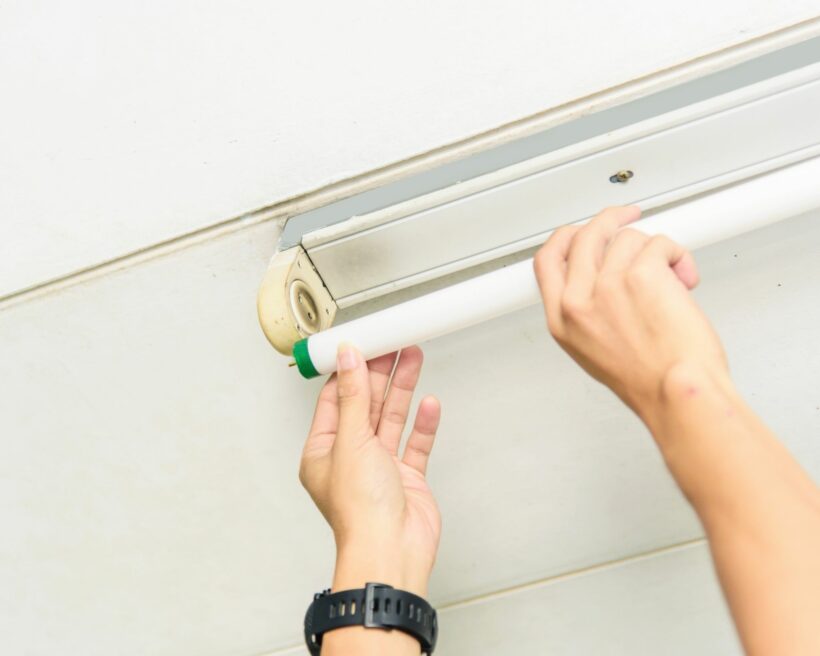
Simple installation: how to replace your old neon with an LED neon tube?
Preparation and electrical safety
For safety reasons, replacing an old fluorescent tube with a tube using LED technology requires some preparation. Above all, you must make sure that the power supply is correctly cut off. This cut must be made at the circuit breaker, not at the switch because it does not guarantee a phase cut (depends on the professionalism of the electrician). You will also need a flashlight if there is ever insufficient direct light, or when doing evening work. A stepladder will also be necessary for an installation at height, as well as a pair of thin gloves to protect you from toxic products, such as mercury present in the fluorescent tube.
Replacing your old neon tube with an LED tube
When it comes to replacing your neon lights, be aware that the procedure differs depending on the ballast you have and the type of neon lights. Replacing a fluorescent neon with an LED neon is not as easy as changing a light bulb.
Some LED neon lights can be wired directly into 230V and others use the existing wiring thanks to a special LED starter. This will depend on the LED neon you purchased. Be careful not to mount a neon made for direct wiring without modifying the electrical installation, this would destroy the neon and possibly the transformer!
Case 1: LED neon supplied with LED starter
If you have a T8 model with old ferromagnetic ballast (as in the example below), you need to replace the existing choke with an LED choke also called a link bridge. To avoid any overvoltage, however, remember to remove any capacitor before installing the LED neon.
For the case of a more recent electronic ballast, it suffices to remove the fluorescent tube, and to place the new LED neon.
Case 2: LED neon without starter LED with direct wiring
The other neon LED technology is the power supply of the tube directly in 230V AC without LED starter without transformer. It has the disadvantage of requiring a little more installation work since it is necessary to rewire the electrical supply but it has the advantage of having no loss of efficiency before the tube and also less risk of breakdown since the ballast and starter no longer exist. If you can choose and you are a minimum handyman or you have a lot of neon lights to change, favor this technology because it will be profitable in the medium term.
The tubes without starter are fed either at each end or from the same side on each of the 2 pins. Remember to check this carefully before starting to modify the wiring.
But don't panic, the wiring is not that difficult to modify but must be rigorously carried out. It is explained below with a neon in direct wiring, one on each end.
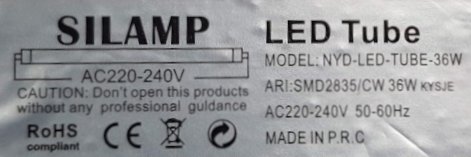
Data sheet of a Silamp neon to be wired directly to the 230V AC at each end. Be careful to pay close attention to this before installing and even buying your LED neon lights!
Photo report and opinion on the assembly and installation of LED neon lights in a garage to replace conventional neon lights with old transformers (ferromagnetic ballasts)
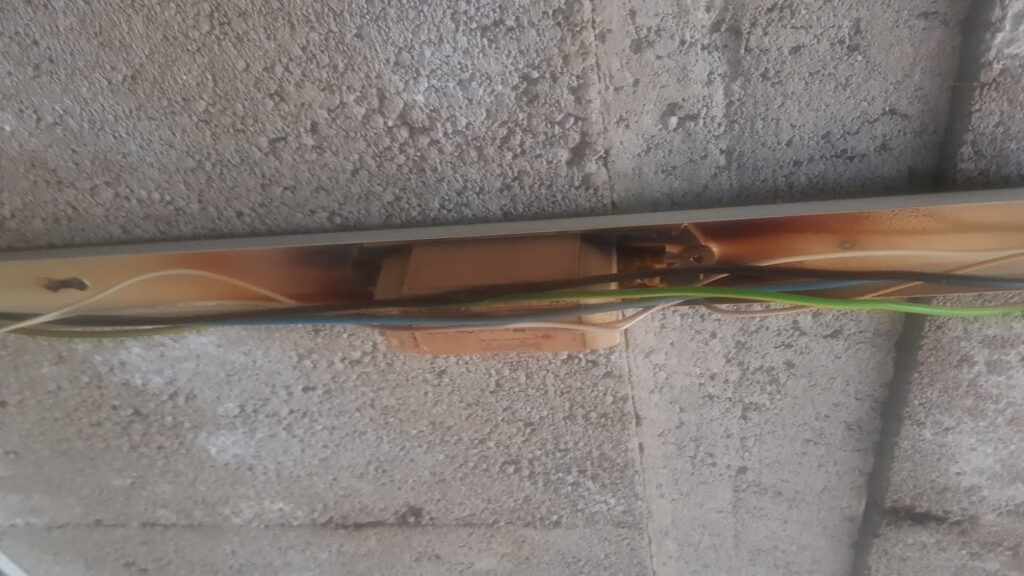
On the occasion of a serious failure of a ballast on a fluorescent neon in my garage, I decided to replace them with 3 Silamp 36W neons. I say serious failure because it could have resulted in a fire. You can see the fairly significant warm-up in the photos below.
The fact that the ceiling slabs were made of concrete undoubtedly prevented the fire. Also, I was working under the lit neon lights when the neon in question hit it cracked and probably would have exploded if I hadn't hopped on the switch. When you know that there is mercury in these classic neon lights, I think I was lucky. After this incident, it was impossible to reignite the neon lights without blowing the circuit breaker…. Even the general jumped during the tests! So there was a big current leak. I tested other starters and neons in vain… and for good reason I had not yet seen the ballast which had heated since it was hidden by a hood.
These Silamp neons cost around € 15 each but were on sale at € 10 when I did my installation. They have a whole range in length, power and colors.
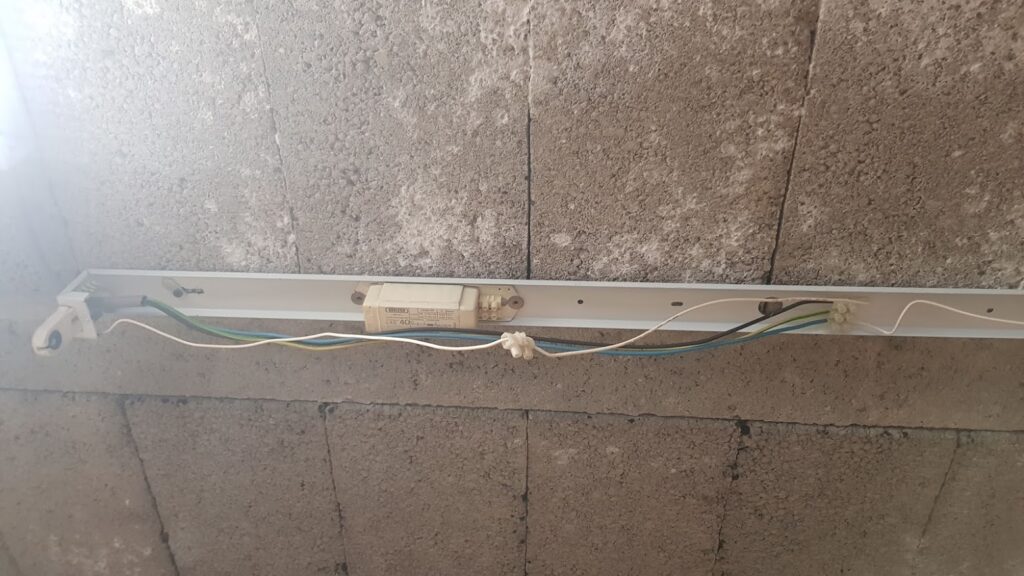
Installation in my garage before the modification: neon tubes and dismantled protective coversThe ballast which heated strongly and blew the circuit breaker. There was a real risk of fire.The installation also included a capacitor, some electricians fitted it to avoid slamming in the switch at start-up as well as to reduce the flickering of neon lights. This capacitor, which has become unnecessary, has obviously been removed.
Replacing a fluorescent neon with the ones I bought requires bypass the ballast and the starter, indeed; they must be supplied directly with 230V AC, 1 wire on each end. Be careful not to assemble them without making this modification, otherwise they will be burnt!
A few dominoes or wago connectors or equivalent, wire cutters, a chair or a ladder and an electric screwdriver are sufficient. Obviously all this work is done with the circuit breaker off. Be careful with the capacitor if you have one because it may still be “charged”.
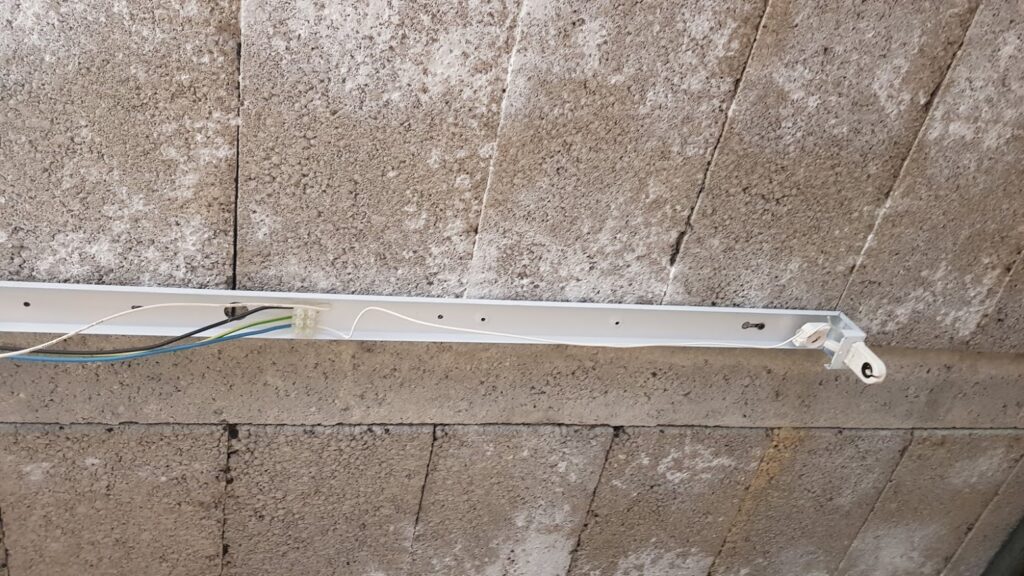
I modified the existing wiring by disconnecting each ballast and putting 1 phase and 1 neutral on the female G13 sockets (these are the connectors that turn at each end of the neon) for each neon. It is also necessary to shunt the choke sleeves. Do not forget to remove the residual threads (there are 2 threads which arrived at each G13 female socket). On the other hand, I did not consider it necessary to mechanically dismantle the 3 ballasts and the choke sockets, I had no use for them elsewhere and the ballasts were riveted on the frames. It took me about 1 hour to understand the wiring and make the modification on the 3 frames.
Electrical modification of a neon frame to mount an LED neon: shunted ballast and phase directly connected to the G13 female socket at the left end ...… And at the right end, we directly wire the neutral. The starter becomes useless.
Once the wiring has been modified, all you have to do is replace the 3 covers and install the tubes. And it's done ! Check all the same that the wiring is good by plugging in the neon tube once without the cover.
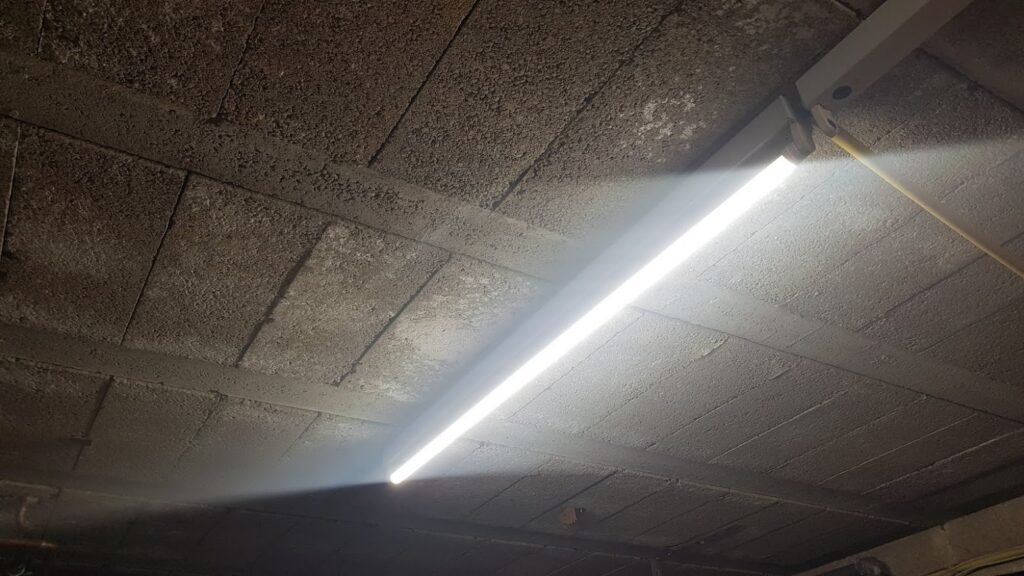
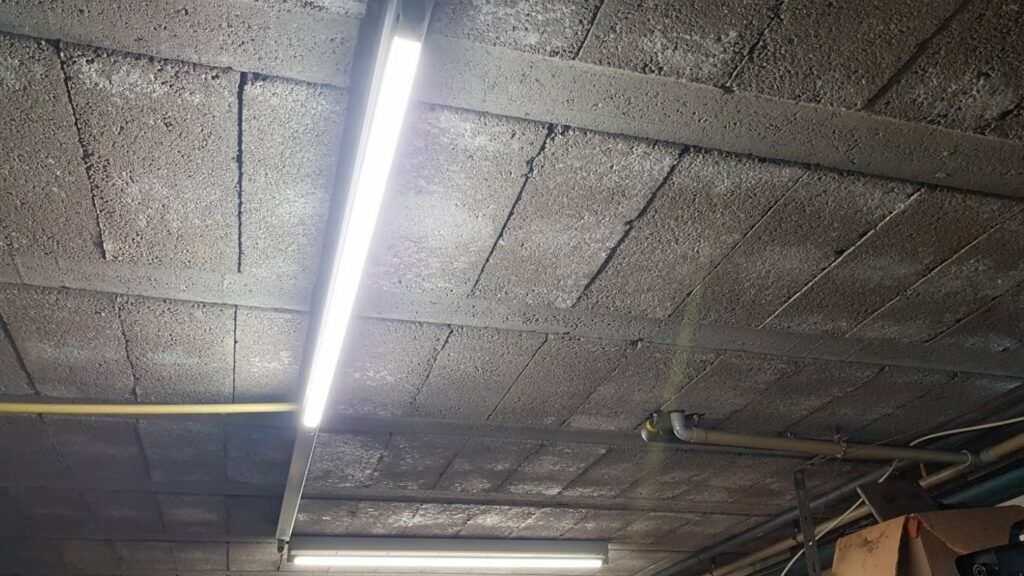
Thanks to the great power of these models, 2 LED neon lights of 36W are enough to illuminate the garage. Two LED neons illuminate better than the 3 fluorescent neons of 36W installed previously. The central neon was therefore not installed. Energy savings are over 35% taking into account the yields. In a garage it is little, on a larger surface the savings can be considerable.
The power of my new installation is such that I no longer need the 3 tubes, 2 neons of 36W are more than enough to obtain a excellent brightness in my garage. And this is logical since the efficiency of LEDs is at least 50% higher than conventional neons.
Other significant benefits
immediate ignition at full power,
the absence of noise (no hum characteristic of classic neon lights)
almost no warm-up, I no longer risk setting the house on fire!
no flickering which can be very dangerous with rotating machines in the workshop (they can appear to be stationary in the event of synchronism)
purely resistive "clean" current (cos ph = 1, no harmonic and any other current disturbances). This is appreciable for very large surfaces to be illuminated.
the absence of a transformer probably also limits electromagnetic waves
It remains to speak of the lifetime : these led neon lights are sold to last 20 hours which still represents over 27 years for 2 hours per day. Will they hold them? Not sure, especially since I am far from turning on my garage for 2 hours a day. Also these LED neons are made of plastic, unbreakable but less durable than glass…. To be continued but in all cases they are guaranteed for 2 years. You can chat with me and other site members about this LED neon installation here
LED neon tube on, the photo taken necessarily against the light does not reflect the real brightness. Don't worry, it illuminates a lot more than the impression of this photo. I'm going to install some in my kitchen too!
2 comments on “Advantages, advice and installation of LED neon lights VS fluorescent or halogen tubes”
Hello,
I have carefully read your installation.
Here is the little knowledge I have:
A ballast in a fluorescent tube always heats up a little. Maybe yours was getting too hot with the wear of the winding insulators?
A fluorescent tube with a single inductive ballast a bad cos phi: 0,5. The capacitor is there to compensate for the inductive cos phi of the ballast.
Regarding led lighting, the cos phi is rarely 1, because a led is a component that operates in direct current (a white led = 3,3v approximately) and therefore an ac-dc converter is needed. And often this converter uses a capacitor therefore cos phi capacitive.
I measured the cos phi of dozens of E27 E14 bulbs from all different brands (philips, osram, lidl, ikea,….) And the finding is clear: most have a cos phi around 0,55 for most .
For your tube, you have to measure. It depends on the circuit used to convert alternating current to direct current
The linky makes the difference between active and reactive load!
Neon lights are awesome and always create atmosphere. Previously, they were only based on glass or plastic tubes. They were just advertisements or bright spots outside. Now everyone can have neon at home. Even the cheapest ones look great. This is what it looks like at home https://www.youtube.com/watch?v=aaD-plZRghE it just looks cool, even though it's a cheap model, and yet they are much better than other companies with programmable diodes. It's definitely better than typical LED strips.