Pantone on a CDI Vito 220
-
binbins4

- I understand econologic

- posts: 165
- Registration: 27/12/04, 09:46
- Location: Geneva, Switzerland)
I haven't given any news for a long time, but I haven't been unemployed. All of my vito tests were unsuccessful. By cons, today it made me tilt. During my first tests with the results, I put a T near the intake pressure tap to spray the water. I deduce from that that it made them feel like the probe. I will try with an aquarium valve without pantone to see if the consumption drops.
0 x

binbins4 wrote:I haven't given any news for a long time, but I haven't been unemployed.
Hello
well, it's been a long time !!! I gave you the taste for forum the other day
ARVI PÂ!
0 x
"To do something is expensive, to do nothing will cost much more." Koffie Annan
next species endangered: Man ... and it will be good for him !!!
MAN IS A VERY DANGEROUS POLLUTION NATURAL!
next species endangered: Man ... and it will be good for him !!!
MAN IS A VERY DANGEROUS POLLUTION NATURAL!
-
binbins4
- I understand econologic
- posts: 165
- Registration: 27/12/04, 09:46
- Location: Geneva, Switzerland)
Hello everyone !
the beautiful days are here long the summer schedule!
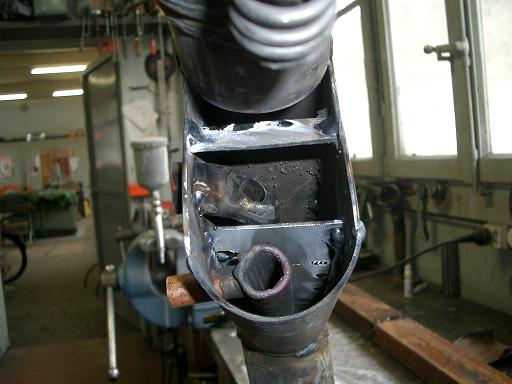
I take again the experiments here is a photo of my assembly (reactor of 250mm GV incorporated and bleed trap at constant level)
a second reactor 160mm hollow (tube for the passage of gas will be in a second time
as you can see I widened the tube to raise the gases and go down again to have more vertical tube, the passage is rather reduced to gain heat
In a third step I will test with the whole system in turbo pressure trap and water tank included
all that remains is to calibrate the loss of the turbo pressure sensor in order to deceive it
https://www.econologie.com/fichiers/partager/7 March 3, 2007 192.jpg
https://www.econologie.com/fichiers/partager/7 March 3, 2007 186.jpg
always a problem with my spaces will have to copy paste
the beautiful days are here long the summer schedule!
I take again the experiments here is a photo of my assembly (reactor of 250mm GV incorporated and bleed trap at constant level)
a second reactor 160mm hollow (tube for the passage of gas will be in a second time
as you can see I widened the tube to raise the gases and go down again to have more vertical tube, the passage is rather reduced to gain heat
In a third step I will test with the whole system in turbo pressure trap and water tank included
all that remains is to calibrate the loss of the turbo pressure sensor in order to deceive it
https://www.econologie.com/fichiers/partager/7 March 3, 2007 192.jpg
https://www.econologie.com/fichiers/partager/7 March 3, 2007 186.jpg
always a problem with my spaces will have to copy paste
0 x
Hi binbins4
I see that you come back and in addition you are up to date with what is doing right now on the forum.
It is true that the GV is practical because very small.
By cons you need big arms to raise your exhaust there
In any case, you are a champion of arc welding.
I'm going to need a lot of experience before making such a beautiful one.
0 x

Hello
Do you weld with a cored or argon gas wire? at first glance it is cored wire, for copper you use a phosphor rod, try the real silver rods, it costs 10 euros for the rod, but it takes so little when the mechanical adjustment is done well and it welds if much better than tin ..
The sheet of the carcass is 3,2 mm it gives less trouble to weld but monitors the fastenings of the exhaust tube, normally it is floating the mass suspended with vibrations will increase.
I did not understand the GV outlet path to reactor input if it is internal or external.
although the internal solution like SPAD eliminates all the problems of condensation and cooling of the vapor.
Keeping us up to date on pressurized reactor pressure tests, I tried the results without being too insistent.
therefore not insisted for a long time on this path ... I quickly get old, time is running out.
Andre
0 x
I have a post to weld.
Semi-automatic I don't know.
What I can't get a handle on is the amount of "carbon" deposit I guess.
I am doing a nice welding. I let it cool, I tap with a small hammer, and there is almost nothing left.
It's really annoying.
I tried to resolder the crutch of my mini chopper and it looks ok.
I have the impression that I adjust the power poorly depending on the sheet.
I tend to put too much.
0 x
Bonjour à tous
I have beeeeeeeeeeuuuuuuuuuugguer
Message to delete, thank you, mediator
Uh Moderator Ouuuuuupppppssss
I have beeeeeeeeeeuuuuuuuuuugguer
Message to delete, thank you, mediator
Uh Moderator Ouuuuuupppppssss
Last edited by RolCopter the 25 / 04 / 07, 16: 56, 2 edited once.
0 x
Less consumption is good
Less pollution is already a great result
Less pollution is already a great result
A good weld is not necessarily a good weld!
Bonjour à tous
From Pitmix
Without wishing to despair some, a small note which engages only me; welding is like body painting there are people who will never master well, and others with a few tips can get some mastery.
I think we should find all the good info on the site that is in this link!
https://www.econologie.com/forums/post50071.html#50071
From Pitmix
I have a post to weld.
Semi-automatic I don't know.
What I can't get a handle on is the amount of "carbon" deposit I guess.
I am doing a nice welding. I let it cool, I tap with a small hammer, and there is almost nothing left.
It's really annoying.
Without wishing to despair some, a small note which engages only me; welding is like body painting there are people who will never master well, and others with a few tips can get some mastery.
I think we should find all the good info on the site that is in this link!
https://www.econologie.com/forums/post50071.html#50071
Last edited by RolCopter the 26 / 04 / 07, 15: 42, 1 edited once.
0 x
Less consumption is good
Less pollution is already a great result
Less pollution is already a great result
Hello pitmix
It would be better if someone adjusted the amperage and showed you for at least 1 hour,
I went up to my two boys the rest they managed.
Start with something 5 to 6 mm thick and learn to see the pressure bath and knit on both surfaces
it's like sewing you have to melt the two pieces and it ends up like fish snacks, no scissors on each side of the weld.
it's practice that makes you happen, not once every 6 months,
with a Mask look at another solder you will quickly understand ..
Andre
0 x
-
- Similar topics
- Replies
- views
- Last message
-
- 6 Replies
- 6588 views
-
Last message by bleusideral
View the latest post
29/04/18, 19:49A subject posted in the forum : Water injection in engines: montages and experiments
-
- 27 Replies
- 30503 views
-
Last message by chatelot16
View the latest post
31/07/16, 11:00A subject posted in the forum : Water injection in engines: montages and experiments
-
- 1 Replies
- 5698 views
-
Last message by Flytox
View the latest post
01/12/15, 22:07A subject posted in the forum : Water injection in engines: montages and experiments
-
- 41 Replies
- 54531 views
-
Last message by Flytox
View the latest post
28/02/14, 18:43A subject posted in the forum : Water injection in engines: montages and experiments
-
- 21 Replies
- 32941 views
-
Last message by dede2002
View the latest post
17/02/14, 21:05A subject posted in the forum : Water injection in engines: montages and experiments
Back to "Water injection in the engines: the assembly and experimentation"
Who is online ?
Users browsing this forum : No registered users and 176 guests